When you buy through links on our site, we may earn an affiliate commission. This keeps it 100% reader supported and free of ads or sponsorships. Thanks for your support!
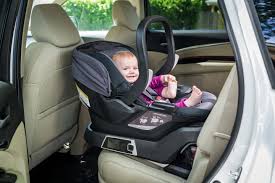
Infant Seat Installation
9 out of 10 car seats are installed incorrectly (or something insane like that). Don’t be one of ’em.
I’ll tell you exactly why this is… you open the car seat manual and realize it’s 97 pages long (and poorly indexed at that) and it’s written in Dutch. Or Japanese. Or Klingon.
You fumble through it to find the appropriate section (the “rear-facing, retractable seat belt” section, for example) and then you wonder… “Hmmm, is that really what I have here? Maybe I’ll use LATCH, but can I even install LATCH in this position?” You then become utterly confused by the instructions and illustrations, which never make much sense anyway. Then your husband skips along and says, “Screw it, honey, let’s just wing it.“
And that’s what 95% of people do when it comes to car seat installation. At least, that’s what I noticed at most of my car seat checks (I used to be a Child Passenger Safety Technician — CPST).
I’m gonna give you a little crash course (no pun intended) so you understand the basic principles of proper car seat installation in your ride; then it’s up to you to figure out how to apply it to your specific situation.
Let’s begin.
When
Anytime between 35-37 weeks is a good time to install your infant (or convertible) seat in preparation for the big day. If you go into labor before 35 weeks, your baby will probably spend some time in the NICU, so you’ll have plenty of time to figure it out in the meantime. After 37 weeks, you could go into labor at any time — and believe me, you don’t want to be installing the car seat for the first time at the hospital(!!).
So pick a nice, sunny, unhurried day and get cozy with your car seat and manual.
If you still haven’t purchased a car seat, refer back here.
Where to Install
The first thing I want you to do is get out the Owner’s Manual for your CAR (yes, your car). Skip the Table of Contents (it’s worthless) and go straight back to the Index. Look for the word “child” (it will either be under “child passenger safety,” “child seat installation,” or… something like that).
Your manual will tell you exactly where you can and cannot safely install a car seat in your particular car.
For example, some cars have LATCH tethers in the middle seat, but most do not (if you want to install it in the middle seat, you’ll probably have to use the seat belt, which is fine — just be aware).
Generally speaking…
All things being equal, the safest position for any car seat is the 2nd row, CENTER. While head-on collisions are the most common, side-impact collisions are the most deadly. Putting your baby in the center of the vehicle increases the physical space between him and a car colliding into him from the side.
HOWEVER… the canned car seat technician response to “Which position is safest for my baby?” is “whichever position you can achieve the best installation.” So if for whatever reason you can’t get a good installation in the center, you’ll have to use one of the sides or “outboard” positions.
If the center position doesn’t work out, you can install the seat on either side. There are pros and cons of each.
Driver side vs. Passenger side Car Seat Installation
1) If you are in a side-impact collision (the worst kind), it will probably occur while you are turning left, thus the driver’s side is safer.
2) The driver will instinctively protect his/her side of the vehicle in an accident (another vote for driver’s side)
3) On the driver’s side, you won’t have to walk all the way around the car each time to get baby in (and out of) her seat.
The downside to the driver’s side (and it’s a big one if you fall into this category) is if you live in an urban environment and parallel park a lot (or just park on the side of the street), installing the seat on the driver’s side of the back seat forces you to be on the traffic-side of the car while getting the baby in and out (assuming we’re in America and driving on the right-hand side of the street. The opposite would be true in the UK and other lefty countries).
I fall into this category, so I prefer to put my younger child’s seat behind the passenger side so I’m not risking my life (and hers) by standing out in traffic every day at preschool drop-off. These rush hour drivers are a littttle scary.
I know this goes without saying, but a rear-facing car seat should NEVER go in the front seat. Why? Because you have a minor fender bender and your airbag gets deployed at 200 mph, which will instantly kill an infant. If you don’t believe me, I’ll tell you some incredibly sad stories from the ER nurses at my CPST training class. Really sad stuff. Yes, many front seat airbags can be turned off with a switch (or automatically), but what if you forget? What if it malfunctions? If you HAVE to put a rear-facing seat in the front seat (like in a pickup truck with no back seat or a two-seater), be damn sure the airbags are turned off!
How to Install
** Preface: Please, please do read the car seat manual. I know it’s a pain, but it’s very important. Hire a translator if you need to. 😉
There are two important aspects of fit that you need to get right:
1. Your baby fitting properly into the seat 2. Your seat being installed properly into the car
Get these two things right and you’re golden! Once you do it a few times, it becomes second nature.
Fitting Baby Into Seat
Generally, the four important aspects of fitting properly into the seat are:
1. Shoulder straps — For rear-facing seats (infant or convertible), straps should be at or just BELOW your baby’s shoulder height. Meaning… the place where the shoulder straps go into the back of the seat should be at or below your baby’s shoulder height. Not above. [For forward-facing seats, it’s the opposite, but we’ll get to that later.]
Most seats come with the straps already in the lowest harness height slot position or next to the lowest position – yay!
If you are using a hand-me-down seat, you’ll need to move the straps to the lowest position yourself. The lowest position should fit the vast majority of newborns.
*Most infant car seats have harness straps that have to be “re-threaded” in order adjust the strap height. Don’t be scared, it’s quite easy.
Re-threading the shoulder straps:
Simply flip the seat over, locate the metal splitter plate (shown below), pull the “strap ends” off each side of the splitter plate. Then, pull the straps back through to the front of the seat — then simply thread them back in at the desired height location, pull them back through and reattach to the splitter plate.
Ta-da!
To watch an instructional video, go here (cue to 2:20).
*You’ll have to do this MANY times in your parenting career, so if you learn it now, you’ll be in great shape.
2. Crotch buckle strap — Some (not all) infant seats have a crotch strap that is adjustable. Check your car seat manual for the proper position. Again, a new seat should come with the strap in the correct position for a newborn.
3. The chest harness clip (below) should be level with the armpits (Remember: Buckle at boobies). It’s not a tummy clip. This buckle is notorious for slipping down near the waist, so always pull it up to armpit level every time.
In case of an accident, you want the chest buckle to hit your child in the sternum, which will properly position the harness over the shoulders… which increases the chance that your child will remain in the seat.
4. Tightness of the straps: The straps should be pulled pretty darn tight. If you can pinch any of the strap material, it’s too loose. You should not be able to do this.
Most car seats have a button and a strap that lies between baby’s legs that can be pulled taut (and loosened) each time to get your baby in and out of the car. For some of the cheaper seats, the tightening occurs on the back of the seat behind the shoulder straps.
LEARN HOW TO USE THIS PROPERLY. It’s crucial to getting a nice, tight fit every time you use it.
For more information on achieving the proper fit for your baby, check the instruction manual.
**Don’t ever put your baby in her car seat wearing a thick coat or snowsuit. Cops report seeing coats strapped into seats after the children who had been wearing them had been ejected. Coats create too much mushy slack in the harness. Instead, use a car seat cover or put a blanket on top to keep her warm. For more about keeping warm in cold climates, click here.
Installing the infant seat base
The majority of people will be using an infant seat installed onto a car seat base, so all you need to do is install the base into your car. The seat simply clicks in and out, as needed.
There are two techniques you can use for installing the base:
1. Using LATCH (Lower Anchors and Tethers for Children, also called ISOFIX in Europe and LUAS in Canada) — or — 2. Using the good ol’ fashioned seat belt
**Do not use LATCH and a seat belt at the same time (except for the Nuna PIPA seat). The forces were not designed to be distributed this way.
Which is better? Both are equally safe techniques, but LATCH was designed to be quicker and easier. LATCH anchors will appear in all vehicles (VEE-hi-culls) starting in model years 2002-2003, although earlier foreign models may have them as well. Consult your owner’s manual to identify the location of the anchors in your car, as some of them may be hiding behind velcro or zippers or WAY back into the “bight” of the seat.
A LATCH anchor is a u-shaped bar hiding in the seat crease that looks something like this:
My advice: Learn how to install the base with a seat belt. Why? Because every vehicle has seat belts (rental cars, taxis, etc.), but not every car has LATCH (I don’t think I’ve ever been in a taxi that has LATCH). You can use LATCH, but know how to use the seat belt too.
A. Installing with LATCH: The seat base should have tethers (straps) on both sides. Once you locate the LATCH anchors in your car, simply push the connectors into the anchors until you hear a click. Then pull to make sure you got it in.
Next, tighten the straps: use leverage by placing your knee at the edge of the seat — foot flat on the floor — and push toward the back of the car while pushing down with a flat palm. You’ll want to pull from inside the seat (check out this great video demonstration here: Install a car seat like a pro: Inside / Outside Trick). In this way, you are compressing both the vehicle seat pan and the vehicle seat back and will get a rock solid installation every time.
B. If installing with a seat belt, simply thread the belt through the belt path of the seat base (check the instructions) and use the same technique as above to tighten.
*Ignore the LATCH tether straps attached to the seat. In fact, just tuck them or click them away so they don’t get in your way.
*Many of the nicer seats have a “seat belt lock-off” (shown above). If you don’t have a seat belt lock-off on the seat itself, you’ll have to lock the seat belt by pulling the entire seat belt strapping out, then slowly letting it go back in. You may not know it, but you are essentially switching the belt into “locked” mode. For more info on locking your seat belt, go here and scroll down to “seat belt shenanigans.“
Proper Car Seat Angle: 30 – 45 Degrees
In addition to the seat or base being properly secured, you must also have it installed at the proper angle (30-45 degrees, or whatever your manual states).
Most seat bases come with a built-in “level” or color-coded gauge that shows you when the seat is at the proper angle; some of the economy car seats just have a leveling line. You can adjust the height of the foot of the base to get it just right. A great video on this can be found here (skip to 0:32).
Infant car seat installation without the base (seat only)
Typically, you don’t need the base to properly use your car seat — it’s just a convenience. To install without the base, just thread the seat belt through the grooves on the side of the seat and tighten in the same manner as above. It should look something like this (for American car seats).
European seats, like the Cybex, some Maxi-Cosi’s, and the Nuna PIPA, have a “European belt path,” which goes behind the head of the seat. These seats are typically easier to install without a base than their American counterparts.
For the seat only, you also have to pay attention to the angle. Check the angle gauge: if it’s not right, you may have to roll up a towel (tightly) to place under the foot of the seat to get that angle right. Don’t neglect to do this.
**Note that for this installation, you have to put your baby in the seat before fastening the seat into the car (obviously).
**It’s not true that the car seat handle has to be in the “down” position while in the car. This myth originated from the earliest ‘based’ car seats in the 1980s, which relied on the handle in the down position to be locked into the base. Your manual will tell you which position(s) the handle should be in — and where it should not be in.
Is it tight enough?
Whether installing the base or the car seat alone, always check to make sure it’s tight enough. Pull the foot of the seat back and forth, and from side to side. It should not move more than 1″ in any direction. If it does, you need to tighten it more.
Note: There will be a lot of play in the unsecured “head” end of the seat (the end that is closest to the front seats) — that’s okay.
Newsflash: Babies Should be Rear-Facing for… a Long Time!
Generally speaking, babies have heavy heads and relatively weak necks with soft bones. In a frontal collision, a forward-facing baby’s neck may stretch and rupture the spinal cord. At about a year of age, their bones start to harden and babies gradually become less vulnerable.
Moms get all bent out of shape about having a rear-facing baby. Look, I get it: it’s much harder to see what’s going on back there and try to comfort baby when she’s freaking out. But suck it up; it’s waaaaay safer.
We always knew that infants should face the rear and recently the AAP has released their new recommendations “The AAP recommends children remain in a rear-facing car safety seat as long as possible, until they reach the highest weight or height allowed by their seat.”
Parents, you’re the guy!!!
I know a lot of parents (ok… moms) who don’t really know how to remove and re-install the car seat or base, or are afraid to. They’ve been scared by propaganda that ensures them they will screw it up and their baby will die a hideous accidental death. I want to encourage you to become a car seat expert. Don’t pawn this responsibility off on someone else.
I have learned over the past year that you cannot rely on ANYONE: the police-officer-who-is-supposed-to-be-an-expert, grandma, your friend with a baby, the rental car guy, or the flight attendant to have any idea what they are talking about when it comes to car seat installation. Most people are TOTALLY INCOMPETENT on the topic and will just make stuff up to placate you. Unacceptable.
Am I telling you not to trust anyone but yourself when it comes to properly installing a car seat in your car, a taxi, or an airplane? Precisely! Be a stickler about it. Get to know that instruction manual and call the manufacturer with any questions. Manufacturers are shockingly helpful.
**Now that you are near the end, you will be receiving two emails a week from me. There’s a lot to tell you…and not a lot of time – ack! If you need to reference any of the previous (or future!) emails, get the goodies here in the archive.
Get practical advice and pro-tips for pregnancy, postpartum and parenting.
Featuring:
The Real Lowdown on Pregnancy
Preparing for Birth
Postpartum Survival Strategies
Breastfeeding, Newborn Sleep Solutions and more
Get a weekly email with practical advice and insights as your baby grows.
Featuring:
Infant Sleep Solutions
Babyproofing
Starting Solids
Pumping at Work and more
Hi there - Welcome to the fold.
Bearing and raising kids is hard, but we're here to simplify everything. Unlike most sites, we offer an ad-free, sponsor-free environment, so you always know you’re getting a full dose of honesty.
If you want to noodle around on our site, our 3 most popular articles are: